Riding a Freebord looks easy, but it’s not. As a beginner, you have to commit to the idea that you’re snowboarding on pavement (not skateboarding). Just like learning to snowboard, it may take several days or weeks to get the hang of it – even if you rip on snow. Be patient and expect to fall down a few times–(here’s a firsthand account from one of our old Pros about how learning from him). You’ll be ripping soon enough.
RIDE SAFE

- Always wear protective gear, including a helmet, wrist guards, knee pads and elbow pads.
- Check the pavement–cracks, manhole covers, water, oil, etc. will affect your slide.
- Keep your weight on your uphill edge.
- Check your board for loose parts before riding.
- Know your abilities and ride under control.
THE RIGHT LOCATION
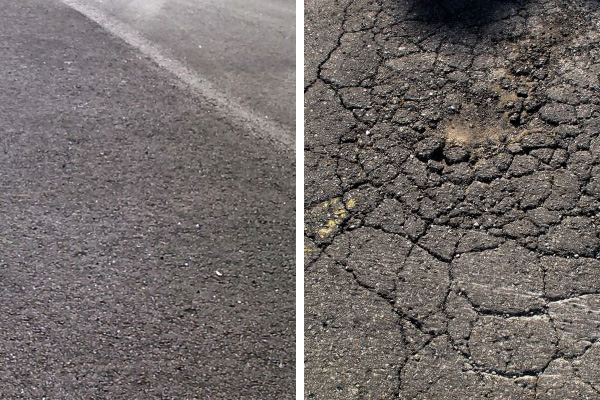
IDEAL | BAD
The right location will help you learn faster. Look for:
- Super smooth pavement with no cracks, ridges or bumps.
- Wide street–just like a bunny hill.
- Moderate incline–enough for momentum but not enough to lose control.
- No traffic.
STOPPING & CARVING
Learn to carve:
- Check that your center wheels are set off the ground and as close to the deck as possible.
- Adjust your kingpin (the big screw that holds the trucks together) so that your trucks are fairly loose. Set your back trucks slightly tighter than your front trucks.
- Center your feet on the board in a comfortable stance, with your toes and heels equidistant to the edges. Your stance should be either centered on the board or slightly toward the board’s nose.
- Ride down the hill making wide sweeping turns. Lean into your turns and feel the board hold its edges.
- Adjust your trucks so you can comfortably turn in both directions. Lighter riders will want looser trucks than heavier riders.
- Continue practicing until you feel comfortable carving on your board.
Learn to slide:
- Using the small allen keys, adjust your center wheels to their highest settings (i.e. as close to the ground as possible). If the board feels too unstable, you can use the second highest setting. As a general guideline, if you tip your board to one side you should just be able to insert a finger underneath the lifted outer wheel (about ½” – 5/8″ off the ground). You must have this clearance to slide properly.
- Assume your stance on the board and feel the rocker from one side to the other. This rocker effect will allow you to transfer your weight from your “edges” to your “base.”
- Try carving your turns as you did earlier. Don’t go straight. As you lean into a turn, roll a small amount of weight off of your trailing edge and onto your center wheels. The lean of your turn will push the board outwards allowing it to slide. This takes some practice so be patient.
- Stay committed to one edge at a time; don’t wobble between them. Keep your weight on one edge as you turn then immediately switch to the other edge to initiate a new turn.
- Always keep your weight on your uphill edge. If you weight your downhill edge you will “catch an edge” and stop abruptly.
- Keep your weight forward on the board and use your rear foot to swing the back end out to start a slide.
- Never ride with your weight directly over the center wheels. As with snowboarding, it’s unstable and you can catch an edge. With practice you’ll learn how to ride straight.
Control your speed. As with snowboarding, there are three basic techniques:
- Carve wide sweeping turns.
- Throw a slide. Anytime you slide you are braking to some degree. The more weight you apply to your uphill edge the more you will slow down.
- Throw a powerslide. This is a slide like in #2 but with the added leverage of leaning back and putting more weight on the trailing wheels. Be careful when powersliding and do not overuse this technique as it is the quickest way to flatspot your wheels. Instead, brake at an angle to the hill to keep your edge wheels spinning while you slide.
ADDITIONAL TIPS
- The more rocker the easier it is to slide. Many beginners prefer to learn this way, even if the board feels more unsteady. If the rocker is too much for you starting out, experiment by raising your center wheel one notch (towards the deck). This will give you less rocker but make it easier to catch an edge. When you improve, you will most likely want as much rocker as possible.
- Experiment with your stance and truck tension. Small adjustments mean a lot and every rider is different. Set your front truck looser than your back truck to help initiate slides. Set them to equal tension if you plan to ride switch at all. Always set your two center wheels to the same height.
- If you’re spinning unintentional 180′s, move your stance and weight forward on the board and square up your shoulders to the fall line.
WHEEL WEAR
- As your outer wheels wear down, adjust the center wheels closer to the deck to maintain a consistent amount of rocker.
- Most riders wear out the rear heelside wheel first. Rotate your wheels in an X pattern to get the most life out of all four.
- Prevent flat spots on your wheels by avoiding slides that are exactly perpendicular to the fall line. Instead, slide diagonally to keep your wheels spinning.
- Harder wheels (82A, 86A) slide easier, last longer and prevent flat spots. Softer wheels (78A, 74A) hold a better edge.
NEED MORE HELP?
JOIN OUR COMMUNITY
One of the best ways to learn is with the help of others, so be sure to check out:
While the above is solid beginning advice, there is far more advice and insights on the nuances of Freebording there than we could ever list here, good luck!